
PowerPoint Font Pairs: A Guide to Fonts in Slide Masters and Themes
Question
Do you change the font from Calibri on each slide of your presentation? Or for some unseen reason, bullet points (not even the kind you like) keep appearing in your Text boxes? Does text in your shapes wrap to the next line even though it looks like there is plenty of room?
You’re not alone. And the changes are much easier and more far reaching than you might ever expect.
Why Setting Fonts in Slide Masters is Important
There are vastly important reasons why you want to set the fonts up on your Slide Master instead of overriding the font on the slide itself. But first, how do you know if this is what you are doing?
✦ The short video below demonstrates what overriding the Body font on the slide itself looks like.
Why you don’t want to do this:
It takes a lot more time.
This leaves heaps of room for error.
Rebranding requires overriding every slide.
It’s messy.
It’s easy to do it right in the first place.
✦ The two images above show the Before | After of the override (the lack of the word (Body) indicates the override).
How to set the font pair on the Slide Master
Doing it right only takes a minute and the more you do it the more you’ll wonder why you haven’t been doing it this way all along.
If you’ve used PowerPoint, you’re likely familiar with the fonts ‘Calibri Light’ and ‘Calibri.’ These two fonts show up as the (Headings) and (Body) font by default. See the image on the right.
However, by creating new Theme fonts using your branded fonts (or a font you like better) will effectively change the default. This will then be the new Headings and Body fonts in the Slide Master and will automatically display every time you create a slide. This includes every Text Box you insert and every shape you create too! No overrides!
To do this we will be accessing the Slide Master. We covered the topic of Slide Masters in greater detail in this issue of Beyond the Deck: BtD #001. Check it out if you’d like some help demystifying Masters and Layouts.
The process to set up Theme fonts (this only needs to be done once) is as follows:
Navigate to the Slide Master:
Menu: View → Slide Master.
Select the Fonts command from the Ribbon.
Select Customize Fonts from the bottom of the dialogue box.
Enter your Headings and Body fonts.
Enter a name for your font pairing and Save.
After you close the dialog box, the name of your custom font pairing will appear at the top of the Fonts list that you opened on the way to this dialog box. You only need to create your new Theme fonts once and they will forever be available to you in every Microsoft application you use.
This new font pairing will automatically be applied to the presentation it was created in. To apply the font pair to a new presentation, simply follow Steps 1 & 2 above and select your font pairing from the Font list (instead of creating it).
The magical aspect of creating Theme fonts is that to make a change globally to your presentation, you need only to navigate to the Slide Master and select the new font pair. All the Headings and Body fonts used with that Slide Master & Layouts will change!
Changing margins in shapes & text boxes
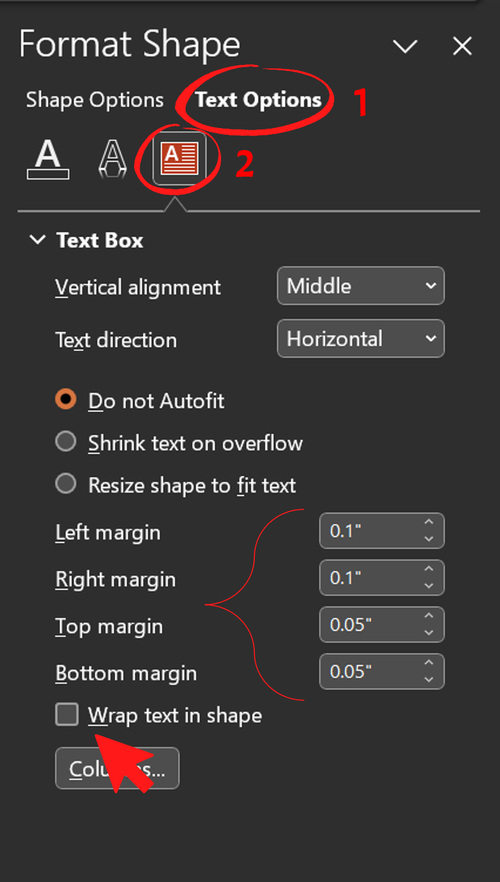
To the right of the bracket (image on the right) you’ll see the PowerPoint default margins for text boxes and shapes. It can often happen that you need to change them. Changing them is simple. It’s finding them that takes a little bit of know-how! It used to trip me up every time!! You just need to remember 1-2. But first, right click on the shape or text box and selecting ‘Format Shape’. This will display the Format Shape pane (as seen below). Then select (1) Text Options and the (2) Textbox icon (marked in the image below).
This will grant you access to the magical margin setting. From here adjust as needed. This will also provide the option to remove the text wrapping or change the Autofit options. To see how to set this as the new shape default check out the next section!

Changing Defaults for Text Boxes & Shapes
This little ‘front-facing slide’ trick is super-simple and will allow you to adjust any aspect of your font setting in either your Text Boxes or Shapes and make it your temporary default. This includes bolding, bullet, color or size. It will also set the default for the margins, fill color, outline or effect. It’s one of the simplest and most powerful time-saving moves I know.
All you need to do is this:
Create a Shape or Text Box on a slide
Make the changes you’d like to see
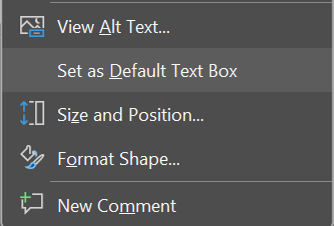
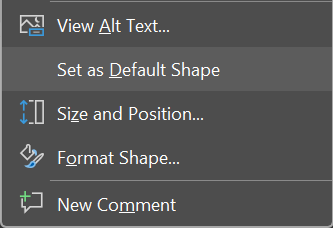
Right Click and select:
Set as Default Text Box/Shape.
✦ Note: These defaults are easily modified and can be switched up as often as you like with no adverse side effects!

Check out my next post on creating your PowerPoint Color Palette!